
While many homeowners think of changing a light switch as a simple DIY job, Australian regulations require most switch replacements to be carried out by a licensed electrician. Even for like-for-like swaps, safety must come first, which is why it’s essential to turn off power at the switchboard. In some cases, a professional may also recommend electrical switchboard upgrades if your system does not have proper RCD protection.
This step-by-step guide will show you how to safely change a light switch, when to call a licensed electrician, and how to ensure your electrical work complies with Australian regulations.
Tools and Safety Equipment You’ll Need
Before you start to change a light switch in Australia, make sure you have the correct tools and safety gear. Using the right equipment ensures the wiring is handled correctly, reduces the chance of electrical hazards, and keeps the switch replacement process safe. Always inspect your tools before beginning any DIY electrical work and call a licensed electrician if you are unsure about the electrical system in your home. For more complex upgrades, such as smart switches or rewiring, a Level 2 electrician may be required to ensure compliance.
Essential Tools and Safety Items
| Tool / Equipment | Purpose |
|---|---|
| Phillips head screwdriver | Used to remove the old switch, loosen terminal screws, and fit the switch plate. |
| Flathead screwdriver | Helpful for prying off the switch cover and tightening flat screws. |
| Voltage tester | Confirms that the circuit is off before touching any light switch wiring. |
| Circuit breaker access | Allows you to turn off the power at the switchboard before starting. |
| New light switch | The replacement switch, whether a standard light switch, dimmer switch, or smart switch. |
| Switch plate / switch cover | Covers the new switch assembly and gives a neat finish. |
| Electrical tape | Provides insulation for exposed wire ends and helps secure connections. |
| Safety gloves | Protect your hands from sharp wire edges and reduce direct contact risks. |
| Torch or portable light | Ensures visibility when the power at the circuit breaker is turned off. |
| Safety glasses | Protects your eyes when working inside the electrical box. |
Step 1: Turn Off Power at the Circuit Breaker
Before touching the wiring in your light switch, it is essential to turn off the power at the switchboard. This is the most important safety step in any light switch replacement. Cutting off electricity from the circuit ensures you can safely change a light switch without the risk of shock or electrical hazards. In older homes, your system may require electrical switchboard upgrades to meet modern safety standards and provide RCD protection before any work is carried out.
In Australia, DIY electrical work must always be approached with caution, and if you are not confident, call a licensed electrician to ensure compliance with Australian safety standards.
Locate the Switchboard
Find the switchboard in your home, usually located in a garage, hallway, or outside wall. Identify the correct circuit that supplies power to the light switch you are replacing.
Turn Off the Circuit Breaker
Switch off the breaker linked to the existing switch. This disconnects the light switch wiring and ensures there is no live current running through the electrical system.
Confirm Power is Off with a Voltage Tester
After turning off the breaker, always inspect the existing switch using a voltage tester. This step confirms there is no electricity flowing through the wires before you begin the switch replacement.
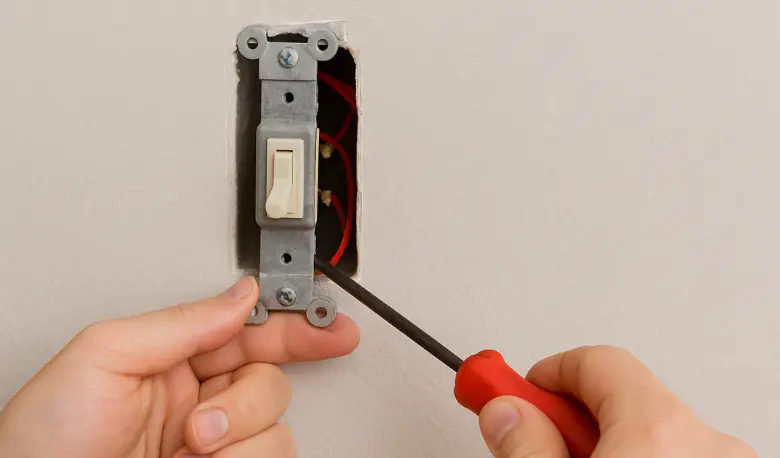
Step 2: Remove the Old Light Switch
Once you have confirmed the power is off, you can safely begin removing the old light switch. This step involves carefully handling the wiring inside the electrical box and ensuring that the active wire is kept under control. Always treat the wiring with caution during any DIY electrical work, and if you notice complex wiring or are unsure of the connections, call a licensed electrician to ensure compliance with Australian standards.
Follow these steps to remove the old switch:
- Use a Phillips head screwdriver or flathead screwdriver to unscrew the light switch cover or switch plate. Keep the screws in a safe place, as you may reuse them when fitting the new light switch.
- Loosen the screws that secure the old switch to the electrical box and gently pull it forward to expose the wiring.
- Inspect the wiring and note the wire colours. In many Australian installations, there will be three wires: the active wire, neutral wire, and earth wire.
- Loosen the terminal screws and carefully disconnect the wires from the old switch. Straighten and inspect the ends of the wire to ensure they are not damaged. If required, re-strip the end of the wire so it is ready for the new switch installation.
Step 3: Install the New Light Switch
With the old switch removed and the wiring prepared, you can now begin the installation of the new light switch. This part of the process requires careful attention to wire placement and secure connections to ensure the electrical system functions safely. For homeowners who prefer professional assistance, a licensed electrician can carry out switch installation to guarantee safe wiring and compliance with Australian standards.
Always double-check that you are working on the correct circuit and that the power at the circuit breaker remains off during this step.
Follow these steps to install the new switch:
- Connect the wires to the new light switch, ensuring the active wire, neutral wire, and earth wire are placed into the correct terminals.
- Tighten the screw terminals securely to hold the wiring in place, making sure no copper wire is exposed.
- Gently fold any excess wire back into the electrical box to avoid crowding and to make space for the switch assembly.
- Position the new switch correctly and fix it into place with screws.
- Fit the switch plate or light switch cover over the assembly, ensuring it sits flush against the wall.
Step 4: Restore Power and Test Your Switch
After the new light switch has been installed, the final step is to restore power and test the switch to confirm it works correctly. This part of the process ensures that the wiring has been connected properly and that the switch replacement was done safely. Always inspect the switch for any signs of faults, such as flickering lights or tripped circuits, and call a licensed electrician if you notice anything unusual.
Follow these steps to restore power and test the switch:
- Return to the switchboard and turn the circuit breaker back on to restore electricity to the circuit.
- Operate the new switch to confirm that the connected light fixtures are working properly.
- Inspect the switch plate and surrounding wall area to make sure it is secure and flush with no gaps.
- If the switch does not function or the circuit breaker trips, stop immediately and call a local electrician to inspect the wiring and ensure compliance with Australian standards.
Common Problems When Changing a Light Switch
Even with careful preparation, some issues can appear after a light switch replacement. These problems are usually linked to wiring, loose connections, or faults in the electrical system. If you encounter repeated tripping or burnt wiring, it may be a sign your home needs a switchboard repair or further inspection by a licensed professional.
Identifying and correcting them quickly is important to ensure compliance with Australian standards and to prevent electrical hazards. If problems persist, always call a licensed electrician to inspect the installation.
| Problem | Solution |
|---|---|
| Loose wiring connections | Tighten the screw terminals and ensure the active wire, neutral wire, and earth wire are properly secured. |
| Circuit breaker trips after installation | Recheck the wiring connections and ensure wires are not crossed. If the problem continues, contact a local electrician. |
| Flickering light fixtures | Inspect the new light switch and wiring for loose or damaged connections. Replace the switch if faults are found. |
| Switch plate not sitting flush | Adjust the switch assembly inside the electrical box and refit the switch plate securely. |
| Old switch wiring confusion | Refer to notes or photos taken during removal of the old switch. If the wiring colours do not match, call a licensed electrician to ensure compliance with Australian regulations. |
Legal Considerations and When to Call a Local Electrician
In Australia, electrical work is heavily regulated to ensure compliance with national standards. Attempting unlicensed electrical work can result in fines, unsafe wiring, and insurance issues. NSW homeowners can check requirements directly through NSW Fair Trading electrical licensing before beginning any project. For guaranteed safety and compliance, hiring a professional for switch installation is the best way to ensure the job is completed legally and correctly.
It is important to understand when a project is suitable for DIY electrical work and when you should hire an electrician to do electrical work properly. A licensed electrician ensures compliance with Australian standards, inspects the wiring, and reduces the chance of electrical hazards caused by poor switch installations.
Hiring the best local electricians also provides peace of mind that your switch replacement or new light switch installation will be done safely and legally. In NSW, for example, NSW Fair Trading requires all electrical work, including light switch wiring, to be performed by a licensed tradesperson. This ensures the work complies with Australian safety codes and prevents issues with insurance or property resale.
When to call a local electrician:
- If the wiring in your home looks complex or unfamiliar.
- If your light switch installation requires a neutral wire or advanced wiring adjustments.
- If you are installing a smart switch or dimmer switch that involves specific light fittings.
- If the circuit breaker keeps tripping after a switch change.
- Any time you are unsure how to safely change a light switch or ensure compliance with Australian standards.
Choosing the Right Light Switch for Your Home
When planning a switch replacement, it helps to choose the right type of light switch for your home. Australian light switches come in several styles, from the standard toggle switch to advanced smart switch options. If you are also upgrading your lighting setup, pairing your new switch with professional lighting installation can improve both energy efficiency and design across your home.
The best choice depends on your wiring setup, the type of light fixtures you have, and whether you want basic function or modern features. Different types of lights may also determine which switch styles are most suitable for your home.
If you are unsure which type of switch to install, a licensed electrician can inspect your existing switch and recommend the safest option that complies with Australian standards.
| Type of Switch | Features | Best Use |
|---|---|---|
| Toggle switch | Standard light switch, simple on/off function, affordable and widely used in Australia. | Basic light switch replacement in most homes. |
| Rocker switch | Flat design, easy to operate, modern appearance, available in single or multiple switch assemblies. | Homes needing an upgrade from old light switches with a more modern style. |
| Dimmer switch | Allows you to adjust light levels, may require specific wiring and dimmable light fittings. | Ideal for living rooms, dining areas, or bedrooms where lighting control is needed. |
| Smart switch | Connects to Wi-Fi or home automation systems, can be controlled by phone or voice assistants. | Suitable for modern homes with smart lighting installations and automation. |
Conclusion
Changing a light switch can seem like a simple DIY electrical task, but it must always be approached with care. The steps of turning off the power at the circuit breaker, removing the old switch, connecting the wires correctly, and fitting the new switch plate highlight how important safety and compliance are in every light switch replacement.
While some homeowners may be able to handle a basic light switch change, Australian regulations require that most electrical work be carried out by a licensed electrician. This ensures the wiring is safe, the installation complies with Australian standards, and your home is protected from electrical hazards.
If you are in Sydney and need a professional light switch installation, Calibre Connect provides trusted and reliable services. Our licensed electricians can inspect your existing switch, handle complex wiring, and install everything from a standard light switch to a smart switch. With Calibre Connect, you can be confident your switch replacement will be done safely, legally, and to the highest standards.
📞 Contact Calibre Connect today for professional light switch installations and electrical services across Sydney.
FAQs
This could be due to a loose connection, a failing bulb, or an incompatible dimmer. Double-check all wiring and make sure your bulb matches the switch type.